Showing posts with label redhat. Show all posts

Tuesday, February 21, 2012

SAMBA client in Linux with GUI

We can connect samba server with GUI mode as like windows machine in Linux.

Run Application will be used to access samba server in Linux with GUI.

Alt+F2 used to open Run Application window.

It looks as follows.

run application

Just type smb://{samba server address} and hit Enter.

Ex.

smb://10.1.1.1

This will open your samba share window. Give password if it asks.

Wednesday, December 21, 2011

Install and Uninstall VMware .bundle in Redhat - RHEL 6

Here the steps for Install and Uninstall VMware .bundle in Redhat and also Linux. I have checked with RHEL 6.

For install :
Login in as root user, Type following command

~]# sh VMware-***.bundle

Here *** will be your software and it's version.

This command will display normal GUI installation. Choose option as your wish.

For Uninstall :
Login in as root user, Type following command


~]# vmware-installer -l

This will display your product name and product version installed by VMware.

Ex:
*
*
*
Product Name         Product Version    
========== ==============
vmware-player        4.0.1.528992   

Note Name and Version, Use following command to uninstall

~]# vmware-installer -u {product-name} {product-version}

Ex:
~]# vmware-installer -u vmware-workstation 8.0.1.528992

Now you can uninstall with GUI.

* This is common for all VMware .bundle installation files. Ex: VMware-Workstation, VMware-Player etc.

Tuesday, July 19, 2011

Add module (driver) while installing RHEL 5

It's an interview question for Linux System Administrator,

You want to install RHEL 5 operating system on server machine. Unfortunately RHEL 5 doesn't detect your hard disk. But you need to install it on that hard disk. How will you do ? You have module disk ( Driver CD/DVD) for that hard disk and RHEL 5 DVD.

I felt this is too hard and searched in several places, But actually it's simple thing, ( I didn't try practically because i don't have that much advance or old hard disk). Ok let us see those very simple steps.
Step 1 : Insert the RHEL 5 CD/DVD and boot from CD/DVD. We will get following screen,


Redhat Boot Screen
click image for zoom

Step 2 : There is submenu , Press F2 for show Installer boot options, It's look like as bellow,

Installer Boot Options
click image for zoom
 
Step 3 : Type "linux dd" and hit enter, you'll get following screen. "linux dd" use to load driver disk,

Driver Disk
click image for zoom
 
Step 4 : It asks whether you have driver disk or not. Select Yes and hit enter. you'll get following screen.

Insert Driver Disk
click image for zoom


Step 5 : Insert your Driver Disk and hit enter. It'll install needed driver from disk.

Now your Hard Disk is detected by the RHEL 5 CD/DVD. Now we can install OS in this Hard Disk.

* Still I not use this method. Hope this will work. If you face this problem. Try and commant me.

Saturday, May 14, 2011

Clear Recent Documents in OpenOffice.org with History Manager for Linux

Here the steps for clearing recent documents list in OpenOffice.org

History Manager is the add-on for OpenOffice.org. We are using this add-on for clearing recent documents.

Step  1 : Download the add-on from here.
Step  2 : Save it anywhere you like.
Step  3 : Open the application OpenOffice.org writer
Step  4 : Go to tools -> Extension Manager
Step  5 : It'll open new window, here click "add" button and choose the file which you downloaded at 1st step.
Step  6 : It may or may not ask for "Only for me" or "For all user". Choose your wish.
Step  7 : It shows agreement, scroll down and click accept button.
Step  8 : Restart the OpenOffice.org writer.
Step  9 : Go to tools -> Add-on -> History Manager
Step 10: Allocate your history size and click OK, If want to clear history, set "0" and click OK

Wednesday, April 6, 2011

Telnet on RedHat

Introduction:
Telnet is a network protocol used on the Internet or local area networks to provide a bidirectional interactive text-oriented communications facility using a virtual terminal connection. User data is interspersed in-band with Telnet control information in an 8-bit byte oriented data connection over the Transmission Control Protocol (TCP).

Installing Telnet on Redhat:
yum is the easy way to installing telnet on redhat. You can use DVD repository if don't have RHN support.

#yum install telnet*

It'll install both server and client of telnet.

Enabling/Configuring telnet on RedHat

Open "/etc/xinetd.d/telnet" file using any editor,

Ex. #vim /etc/xinetd.d/telnet

In this file want to change "disable = yes" to "disable = no"

For restarting telnet service run following command, If getting error on stoping service ignore it

#service xinetd restart 
#chkconfig xinetd on

Now you can connect telnet server by telnet client on network.

Telnet client
In Linux, open terminal and run this command,  #telnet SERVER_IP
In Windows, open dos prompt,  >telnet SERVER_IP

Tuesday, April 5, 2011

IpTables - The Linux Firewall

Introduction :
IpTables is the user space program , which is used create rules for packet filtering. IpTables used for create Firewall rules in Linux System. Before going to IpTables , first we want to get some knowledge about Firewall.

A firewall is a device or set of devices designed to permit or deny network transmissions based upon a set of rules and is frequently used to protect networks from unauthorized access. Many personal computer operating systems (windows, linux, mac, etc) include software-based firewalls to protect against threats from the public Internet. Many routers that pass data between networks contain firewall components and, conversely, many firewalls can perform basic routing functions.

Installation on linux:

Before going to installation , we need to check whether our kernel was compiled with iptables support. Follwoing steps are used to check.

# cat /boot/config-your.kernel.version.here | grep -i "CONFIG_IP_NF_IPTABLES"

If we get the display as CONFIG_IP_NF_IPTABLES=m , Our Kernel was compiled with iptables support. '=m' means iptables was compiled as a module.

First we need to check whether the iptables installed already. Here i'm using redhat enterprice linux. So using the command as follows,

# rpm -qa | grep iptables.

If you get output like iptables-INSTALLED-VERSION , Or you need to install iptables.

For installation, download iptables file from internet , or install using yum.

# rpm -qa | grep iptables
# rpm -Uvh iptables-downloaded.version.rpm


Importent files for iptables

/etc/init.d/iptables is the INIT script which is used to start, stop the service and/or to save the rulesets.
/etc/sysconfig/iptables this is the file that holds the saved rulesets.
/sbin/iptables and this is the iptables binary.

Checking current configuration

#iptables -L

There are 3 default chains avaliable. INPUT, OUTPUT, FORWARD.
INPUT - Rules for incoming traffic to server.
OUTPUT - Rules for outgoing traffic from server to Internet.
FORWARD - Rules for traffic forward to chients or server on network (LAN...).

When traffic moves through Linux kernel, a TARGET is determined by whether the packet matches a rule in the rulesets or not. There are three main targets are avaliable.

ACCEPT - Traffic is allowed to pass through linux server to its destination.
REJECT - Traffic is blocked from its destination and a packet is sent back to the sending host with a explanation by linux server.
DROP - Traffic is blocked with no explanation (Like closing connection).

Before going to configure new ruleset , following things are very importent.


Should know the order of rules going to add in ruleset. If order changes , It will give very bad results sometime. If your first rule is to deny everything... then no matter what you specifically allow, it will be denied.

Rule set is not active till you save rule. It will be done by seprate command.

If you are using ssh for configure iptables on remote server, first you shoud allow yourself.

Basic Iptables Options

Here are some of the iptables options.

-A - Append this rule to a rule chain. Valid chains for what we're doing are INPUT, FORWARD and OUTPUT, but we mostly deal with INPUT in this tutorial, which affects only incoming traffic.

-L - List the current filter rules.

-m conntrack - Allow filter rules to match based on connection state. Permits the use of the --ctstate option.
   --ctstate - Define the list of states for the rule to match on. Valid states are:
         NEW - The connection has not yet been seen.
         RELATED - The connection is new, but is related to another connection already permitted.
         ESTABLISHED - The connection is already established.
         INVALID - The traffic couldn't be identified for some reason.

-m limit - Require the rule to match only a limited number of times. Allows the use of the --limit option. Useful for limiting logging rules.
   --limit - The maximum matching rate, given as a number followed by "/second", "/minute", "/hour", or "/day" depending on how often you want the rule to match. If this option is not used and -m limit is used, the default is "3/hour".

-p - The connection protocol used.
   --dport - The destination port(s) required for this rule. A single port may be given, or a range may be given as start:end, which will match all ports from start to end, inclusive.

-j - Jump to the specified target. By default, iptables allows four targets:
        ACCEPT - Accept the packet and stop processing rules in this chain.
        REJECT - Reject the packet and notify the sender that we did so, and stop processing rules in this chain.
        DROP - Silently ignore the packet, and stop processing rules in this chain.
        LOG - Log the packet, and continue processing more rules in this chain. Allows the use of the --log-prefix and --log-level options.
--log-prefix - When logging, put this text before the log message. Use double quotes around the text to use.

--log-level - Log using the specified syslog level. 7 is a good choice unless you specifically need something else.

-i - Only match if the packet is coming in on the specified interface.

-I - Inserts a rule. Takes two options, the chain to insert the rule into, and the rule number it should be.
     -I INPUT 5 would insert the rule into the INPUT chain and make it the 5th rule in the list.

-v - Display more information in the output. Useful for if you have rules that look similar without using -v.

-s --source - address[/mask] source specification

-d --destination - address[/mask] destination specification

-o --out-interface - output name[+] network interface name ([+] for wildcard)

Allowing connections

We want to use some standard rules for general network traffic. The 3 way handshake between two hosts when transmitting data.

  • NEW => Server1 connects to Server2 issuing a SYN (Synchronize) packet.
  • RELATED => Server 2 receives the SYN packet, and then responds with a SYN-ACK (Synchronize Acknowledgment) packet.
  • ESTABLISHED => Server 1 receives the SYN-ACK packet and then responds with the final ACK (Acknowledgment) packet.
After this 3 way handshake is complete, the traffic is now ESTABLISHED. In order for this type of TCP communication, something similar to these three rules are necessary:

# iptables -A INPUT -m state --state RELATED,ESTABLISHED -j ACCEPT
# iptables -A FORWARD -i eth0 -m state --state RELATED,ESTABLISHED -j ACCEPT
# iptables -A OUTPUT -m state --state NEW,RELATED,ESTABLISHED -j ACCEPT


The last rule obviously allows any traffic the leave the server.

Now that we have our basics set in place, lets see what iptables lists for our rulesets:
# iptables --list
Chain INPUT (policy ACCEPT) target prot opt source destination
ACCEPT all -- anywhere anywhere state RELATED,ESTABLISHED

Chain FORWARD (policy ACCEPT) target prot opt source destination
ACCEPT all -- anywhere anywhere state RELATED,ESTABLISHED

Chain OUTPUT (policy ACCEPT) target prot opt source destination
ACCEPT all -- anywhere anywhere state NEW,RELATED,ESTABLISHED


Allowing Incoming Traffic on Specific Ports
You could start by blocking traffic, but you might be working over SSH, where you would need to allow SSH before blocking everything else.

To allow incoming traffic on the default SSH port (22), you could tell iptables to allow all TCP traffic on that port to come in.

# iptables -A INPUT -p tcp --dport ssh -j ACCEPT

Referring back to the list above, you can see that this tells iptables:
• append this rule to the input chain (-A INPUT) so we look at incoming traffic
• check to see if it is TCP (-p tcp).
• if so, check to see if the input goes to the SSH port (--dport ssh).
• if so, accept the input (-j ACCEPT).

Lets check the rules: (only the first few lines shown, you will see more)

# iptables -L
Chain INPUT (policy ACCEPT) target prot opt source destination
ACCEPT all -- anywhere anywhere state RELATED,ESTABLISHED
ACCEPT tcp -- anywhere anywhere tcp dpt:ssh


Allow all incoming web traffic
# iptables -A INPUT -p tcp --dport 80 -j ACCEPT

Checking our rules, we have 

# iptables -L
Chain INPUT (policy ACCEPT)target prot opt source destination
ACCEPT all -- anywhere anywhere state RELATED,ESTABLISHED
ACCEPT tcp -- anywhere anywhere tcp dpt:ssh
ACCEPT tcp -- anywhere anywhere tcp dpt:www

Some more ruleset for iptables, For easy understanding

Individual REJECTS First:

BAD GUYS (Block Source IP Address):
# iptables -A INPUT -s 172.34.5.8 -j DROP

NO SPAMMERS (notice the use of FQDN):
# iptables -A INPUT -s mail.spammer.org -d 10.1.15.1 -p tcp --dport 25 -j REJECT

Then Open it up

MYSQL (Allow Remote Access To Particular IP):
# iptables -A INPUT -s 172.50.3.45 -d 10.1.15.1 -p tcp --dport 3306 -j ACCEPT

SSH:
# iptables -A INPUT -d 10.1.15.1 -p tcp --dport 22 -j ACCEPT

Sendmail/Postfix:
# iptables -A INPUT -d 10.1.15.1 -p tcp --dport 25 -j ACCEPT

FTP: (Notice how you can specify a range of ports 20-21)
# iptables -A INPUT -d 10.1.15.1 -p tcp --dport 20:21 -j ACCEPT

Passive FTP Ports Maybe: (Again, specifying ports 50000 through 50050 in one rule)
# iptables -A INPUT -d 10.1.15.1 -p tcp --dport 50000:50050 -j ACCEPT

HTTP/Apache
# iptables -A INPUT -d 10.1.15.1 -p tcp --dport 80 -j ACCEPT

SSL/Apache
# iptables -A INPUT -d 10.1.15.1 -p tcp --dport 443 -j ACCEPT

IMAP
# iptables -A INPUT -d 10.1.15.1 -p tcp --dport 143 -j ACCEPT

IMAPS
# iptables -A INPUT -d 10.1.15.1 -p tcp --dport 993 -j ACCEPT

POP3
# iptables -A INPUT -d 10.1.15.1 -p tcp --dport 110 -j ACCEPT

POP3S
# iptables -A INPUT -d 10.1.15.1 -p tcp --dport 995 -j ACCEPT

Any Traffic From Localhost:
# iptables -A INPUT -d 10.1.15.1 -s 127.0.0.1 -j ACCEPT

ICMP/Ping:
# iptables -A INPUT -d 10.1.15.1 -p icmp -j ACCEPT

Global REJECTS Last:
Reject everything else to that IP:

# iptables -A INPUT -d 10.1.15.1 -j REJECT

Or, reject everything else coming through to any IP:
# iptables -A INPUT -j REJECT
# iptables -A FORWARD -j REJECT


Saving rules in iptables

For save active rules:
# /etc/init.d/iptables save This will save rules to '/etc/sysconfig/iptables'.

If start iptables, the rules are read from '/etc/sysconfig/iptables'
# /etc/init.d/iptables startStarting iptables [OK]

If you stop iptables, all rules are flushed
# /etc/init.d/iptables stopStopping iptables [OK]

Export and importing rulesets to file

# iptables-save > /root/iptables-save.out This will save rules to iptables-save.out file

# iptables-restore -c /root/iptables-save.out
The -c tells iptables-restore that this is file was created using iptables-save to ruleset.

Conclusion
This is a basic tutorial about iptables. We can do lot of things by iptables. I hope good practice on iptables only give better knowledge. Keep practicing.

      Reference : Lot of articles from internet. Thanks to all. 

Tuesday, January 18, 2011

Learning MySQL on linux - Installation

MySQL on Linux

MySQL - Installation 

Installing mysql on Redhat is very simple wia repostory also packages are avaliable in redhat dvd itself. For more information click, dvd repository and rpm forge. For detailed installation about MySQL with all systems check this page.

Normaly MySQL having 2 parts,
  • MySQL Server
  • MySQL Client
MySQL server -  It's program to managing storage of data

MySQL Client - It's a program for user intraction and we can get stored data by queries. 

Installing MySQL with repository

Open terminal window and in root account, run following comment

#yum install mysql*


type y and hit enter, this will install MySQL on your redhat system.

For start MySQL,

in terminal type " service mysqld start " without cotes.


For check status of MySQL running on your linux box, in terminal type "service mysqld status " without cotes.


Login in to MySQL on linux box,

In terminal window, type

#mysql -u root mysql

and hit enter, you get a mysql prompt as follow,


In mysql -u root mysql,

mysql :
mysql -u root mysql

highlighted 'mysql' will start mysql client for user intraction.

-u :
mysql -u root mysql

highlighted '-u' says to MySQL chient which user want to login into MySQL server.

root :
mysql -u root mysql

highlighted 'root' mentioning mysql should login as root user. (It's not linux root user, It's root user of MySQL server). It gives full control of MySQL server.

mysql:
mysql -u root mysql
highlighted 'mysql' is a database, this database in by default in MySQL server. It have several table.

Set password for MySQL user:

type following command after login in to mysql server,

mysql>SET PASSWORD FOR root@localhost=PASSWORD('rootpass');

here,

SET PASSWORD FOR root@localhost=PASSWORD('rootpass');

highlighted things are queries,

root@localhost, is user name with host address ,

rootpass is password for root login.

Learning MySQL on linux - Introduction

MySQL on Linux

MySQL - Introduction

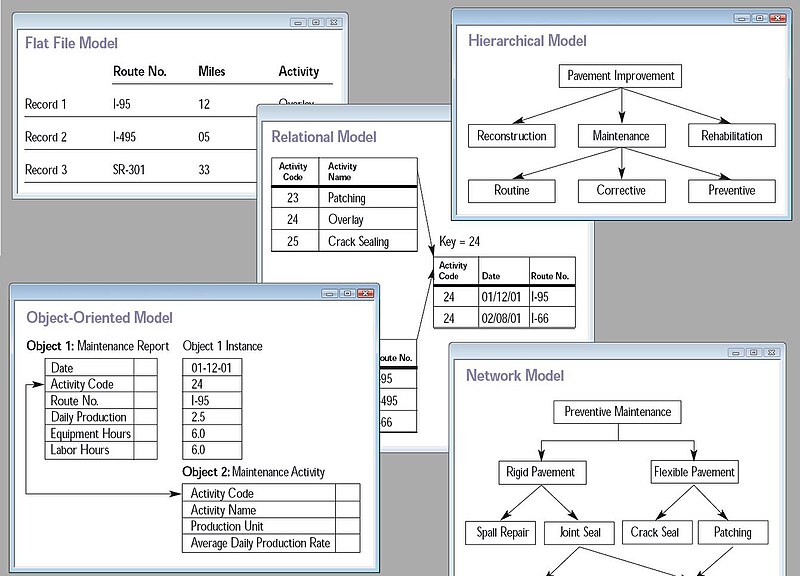
MySQL is a relational database management system (RDBMS).

The Database is a system for store, organize and retrieve large amount of data fast and easily. It have a collection of data for multiple uses in digital form.

A Database Management System (DBMS) is a set of computer programs that controls the creation, maintenance, and the use of a database. A DBMS is a system software package that helps the use of integrated collection of data records and files known as databases. It allows different user application programs to easily access the same database. In large systems, a DBMS allows users and other software to store and retrieve data in a structured way. Instead of having to write computer programs to extract information, user can ask simple questions in a query language. DBMSs may use any of a variety of database models, such as the network model or relational model.

A Database model is the theoretical foundation of a database and fundamentally determines in which manner data can be stored, organized and manipulated in a database system. It thereby defines the infrastructure offered by a particular database system. The most popular example of a database model is the relational model.

Models:
  • Hierarchical model
  • Network model
  • Relational model
  • Entity-relationship
  • Object-relational model
  • Object model

The relational model for database management is a database model based on first-order predicate logic, first formulated and proposed in 1969 by E.F. Codd.

A relational database management system (RDBMS) is a database management system (DBMS) that is based on the relational model as introduced by E. F. Codd. Most popular commercial and open source databases currently in use are based on the relational database model.
A short definition of an RDBMS may be a DBMS in which data is stored in the form of tables and the relationship among the data is also stored in the form of tables.
SQL - Structured Query Language is database computer language designed for managing data in Relational database management system. ( Developed by IDM )

MySQL - is a relational database management system (RDBMS) that runs as a server providing multi-user access to a number of databases. The MySQL development project has made its source code available under the terms of the GNU General Public License, as well as under a variety of proprietary agreements. MySQL was owned and sponsored by a single for-profit firm, the Swedish company MySQL AB, now owned by Oracle Corporation.

Difference between SQL & MySQL

SQL (Structured Query Language) is computer language that can be used to access data stored in relational databases.  SQL is not itself a standalone computer application, but is part of many relational Database programs like MySQL, Oracle, Sybase, Microsoft SQL Server, etc.

MySQL is open source database management system. It's an application. It've SQL interpreter, a database manager component, GUI database viewers, and session monitoring tools, etc. MySQL is a multithreaded, multi-user SQL database management system (DBMS) providing multi-user access to a number of databases. 

The difference between SQL and MySQL are like, difference between HTML and Dreamweaver. HTML is webpages standard, dreamweaver is computer application that can be used to create, edit webpages.


Reference : Wikipedia and some websites on Internet.

Tuesday, October 19, 2010

Linux Boot Process - Step by Step

In the early days, bootstrapping a computer meant feeding a paper tape containing a boot program or manually loading a boot program using the front panel address/data/control switches. Today's computers are equipped with facilities to simplify the boot process, but that doesn't necessarily make it simple.
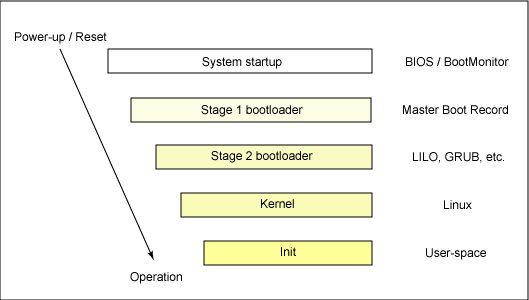
The 20,000-foot view of the Linux boot process
When a system is first booted, or is reset, the processor executes code at a well-known location. In a personal computer (PC), this location is in the basic input/output system (BIOS), which is stored in flash memory on the motherboard. The central processing unit (CPU) in an embedded system invokes the reset vector to start a program at a known address in flash/ROM. In either case, the result is the same. Because PCs offer so much flexibility, the BIOS must determine which devices are candidates for boot.

The small program that starts this sequence of loading into RAM, is known as a bootstrap loader, bootstrap or boot loader. This small boot loader program's only job is to load other data and programs which are then executed from RAM. Often, multiple-stage boot loaders are used, during which several programs of increasing complexity sequentially load one after the other in a process of chain loading.

When a boot device is found, the first-stage boot loader is loaded into RAM and executed. This boot loader is less than 512 bytes in length (a single sector), and its job is to load the second-stage boot loader.
When the second-stage boot loader is in RAM and executing, a splash screen is commonly displayed, and Linux and an optional initial RAM disk (temporary root file system) are loaded into memory. When the images are loaded, the second-stage boot loader passes control to the kernel image and the kernel is decompressed and initialized. At this stage, the second-stage boot loader checks the system hardware, enumerates the attached hardware devices, mounts the root device, and then loads the necessary kernel modules. When complete, the first user-space program (init) starts, and high-level system initialization is performed.That's Linux boot in a nutshell. Now let's dig in a little further and explore some of the details of the Linux boot process.

System startup 
The system startup stage depends on the hardware that Linux is being booted on. On an embedded platform, a bootstrap environment is used when the system is powered on, or reset. Examples include U-Boot, RedBoot, and MicroMonitor from Lucent. Embedded platforms are commonly shipped with a boot monitor. These programs reside in special region of flash memory on the target hardware and provide the means to download a Linux kernel image into flash memory and subsequently execute it. In addition to having the ability to store and boot a Linux image, these boot monitors perform some level of system test and hardware initialization. In an embedded target, these boot monitors commonly cover both the first- and second-stage boot loaders.

Extracting the MBR

To see the contents of your MBR, use this command:
# dd if=/dev/hda of=mbr.bin bs=512 count=1
# od -xa mbr.bin The dd command, which needs to be run from root, reads the first 512 bytes from /dev/hda (the first Integrated Drive Electronics, or IDE drive) and writes them to the mbr.bin file. The od command prints the binary file in hex and ASCII formats.

In a PC, booting Linux begins in the BIOS at address 0xFFFF0. The first step of the BIOS is the power-on self test (POST). The job of the POST is to perform a check of the hardware. The second step of the BIOS is local device enumeration and initialization.

Given the different uses of BIOS functions, the BIOS is made up of two parts: the POST code and runtime services. After the POST is complete, it is flushed from memory, but the BIOS runtime services remain and are available to the target operating system.

To boot an operating system, the BIOS runtime searches for devices that are both active and bootable in the order of preference defined by the complementary metal oxide semiconductor (CMOS) settings. A boot device can be a floppy disk, a CD-ROM, a partition on a hard disk, a device on the network, or even a USB flash memory stick.

Commonly, Linux is booted from a hard disk, where the Master Boot Record (MBR) contains the primary boot loader. The MBR is a 512-byte sector, located in the first sector on the disk (sector 1 of cylinder 0, head 0). After the MBR is loaded into RAM, the BIOS yields control to it.

Stage 1 boot loader
The primary boot loader that resides in the Master Boot Record (MBR) is a 512-byte image containing both program code and a small partition table (see Figure 2). The first 446 bytes are the primary boot loader, which contains both executable code and error message text. The next sixty-four bytes are the partition table, which contains a record for each of four partitions (sixteen bytes each). The MBR ends with two bytes that are defined as the magic number (0xAA55). The magic number serves as a validation check of the MBR.

Anatomy of the MBR
The job of the primary boot loader is to find and load the secondary boot loader (stage 2). It does this by looking through the partition table for an active partition. When it finds an active partition, it scans the remaining partitions in the table to ensure that they're all inactive. When this is verified, the active partition's boot record is read from the device into RAM and executed. 

Stage 2 boot loader
The secondary, or second-stage, boot loader could be more aptly called the kernel loader. The task at this stage is to load the Linux kernel and optional initial RAM disk. 

GRUB stage boot loaders

The /boot/grub directory contains the stage1, stage1.5, and stage2 boot loaders, as well as a number of alternate loaders (for example, CR-ROMs use the iso9660_stage_1_5).

The first- and second-stage boot loaders combined are called Linux Loader (LILO) or GRand Unified Bootloader (GRUB) in the x86 PC environment. Because LILO has some disadvantages that were corrected in GRUB, let's look into GRUB.

The great thing about GRUB is that it includes knowledge of Linux file systems. Instead of using raw sectors on the disk, as LILO does, GRUB can load a Linux kernel from an ext2 or ext3 file system. It does this by making the two-stage boot loader into a three-stage boot loader. Stage 1 (MBR) boots a stage 1.5 boot loader that understands the particular file system containing the Linux kernel image. Examples include reiserfs_stage1_5 (to load from a Reiser journaling file system) or e2fs_stage1_5 (to load from an ext2 or ext3 file system). When the stage 1.5 boot loader is loaded and running, the stage 2 boot loader can be loaded.

With stage 2 loaded, GRUB can, upon request, display a list of available kernels (defined in /etc/grub.conf, with soft links from /etc/grub/menu.lst and /etc/grub.conf). You can select a kernel and even amend it with additional kernel parameters. Optionally, you can use a command-line shell for greater manual control over the boot process.

With the second-stage boot loader in memory, the file system is consulted, and the default kernel image and initrd image are loaded into memory. With the images ready, the stage 2 boot loader invokes the kernel image. 

Kernel
With the kernel image in memory and control given from the stage 2 boot loader, the kernel stage begins. The kernel image isn't so much an executable kernel, but a compressed kernel image. Typically this is a zImage (compressed image, less than 512KB) or a bzImage (big compressed image, greater than 512KB), that has been previously compressed with zlib. At the head of this kernel image is a routine that does some minimal amount of hardware setup and then decompresses the kernel contained within the kernel image and places it into high memory. If an initial RAM disk image is present, this routine moves it into memory and notes it for later use. The routine then calls the kernel and the kernel boot begins.

When the bzImage (for an i386 image) is invoked, you begin at ./arch/i386/boot/head.S in the start assembly routine (see Figure 3 for the major flow). This routine does some basic hardware setup and invokes the startup_32 routine in ./arch/i386/boot/compressed/head.S. This routine sets up a basic environment (stack, etc.) and clears the Block Started by Symbol (BSS). The kernel is then decompressed through a call to a C function called decompress_kernel (located in ./arch/i386/boot/compressed/misc.c). When the kernel is decompressed into memory, it is called. This is yet another startup_32 function, but this function is in ./arch/i386/kernel/head.S.

Manual boot in GRUB

From the GRUB command-line, you can boot a specific kernel with a named initrd image as follows:
grub> kernel /bzImage-2.6.14.2
  [Linux-bzImage, setup=0x1400, size=0x29672e]

grub> initrd /initrd-2.6.14.2.img
  [Linux-initrd @ 0x5f13000, 0xcc199 bytes]

grub> boot

Uncompressing Linux... Ok, booting the kernel.
If you don't know the name of the kernel to boot, just type a forward slash (/) and press the Tab key. GRUB will display the list of kernels and initrd images.

In the new startup_32 function (also called the swapper or process 0), the page tables are initialized and memory paging is enabled. The type of CPU is detected along with any optional floating-point unit (FPU) and stored away for later use. The start_kernel function is then invoked (init/main.c), which takes you to the non-architecture specific Linux kernel. This is, in essence, the main function for the Linux kernel.

Major functions flow for the Linux kernel i386 boot
With the call to start_kernel, a long list of initialization functions are called to set up interrupts, perform further memory configuration, and load the initial RAM disk. In the end, a call is made to kernel_thread (in arch/i386/kernel/process.c) to start the init function, which is the first user-space process. Finally, the idle task is started and the scheduler can now take control (after the call to cpu_idle). With interrupts enabled, the pre-emptive scheduler periodically takes control to provide multitasking.

During the boot of the kernel, the initial-RAM disk (initrd) that was loaded into memory by the stage 2 boot loader is copied into RAM and mounted. This initrd serves as a temporary root file system in RAM and allows the kernel to fully boot without having to mount any physical disks. Since the necessary modules needed to interface with peripherals can be part of the initrd, the kernel can be very small, but still support a large number of possible hardware configurations. After the kernel is booted, the root file system is pivoted (via pivot_root) where the initrd root file system is unmounted and the real root file system is mounted.

decompress_kernel output

The decompress_kernel function is where you see the usual decompression messages emitted to the display:
Uncompressing Linux... Ok, booting the kernel.

The initrd function allows you to create a small Linux kernel with drivers compiled as loadable modules. These loadable modules give the kernel the means to access disks and the file systems on those disks, as well as drivers for other hardware assets. Because the root file system is a file system on a disk, the initrd function provides a means of bootstrapping to gain access to the disk and mount the real root file system. In an embedded target without a hard disk, the initrdcan be the final root file system, or the final root file system can be mounted via the Network File System (NFS). 

Init
After the kernel is booted and initialized, the kernel starts the first user-space application. This is the first program invoked that is compiled with the standard C library. Prior to this point in the process, no standard C applications have been executed.

In a desktop Linux system, the first application started is commonly /sbin/init. But it need not be. Rarely do embedded systems require the extensive initialization provided by init (as configured through /etc/inittab). In many cases, you can invoke a simple shell script that starts the necessary embedded applications. 

Summary
Much like Linux itself, the Linux boot process is highly flexible, supporting a huge number of processors and hardware platforms. In the beginning, the loadlin boot loader provided a simple way to boot Linux without any frills. The LILO boot loader expanded the boot capabilities, but lacked any file system awareness. The latest generation of boot loaders, such as GRUB, permits Linux to boot from a range of file systems (from Minix to Reiser).

source : http://www.ibm.com/developerworks/linux/library/l-linuxboot/
                http://en.wikipedia.org

Monday, October 4, 2010

Connect Windows printer to Linux machine via samba

You can connect windows printer to Linux machine easily,

Before make a printer connection do following things,

In windows,


In Linux,

Do following,

  1. Open browser and type http://localhost:631 hit enter.
  2. Click Add Printer.
  3. Give Name for printer and click continue. ( Other are optional ).
  4. Choose Device from list (Windows Printer via SAMBA) and click continue.
  5. Give the  device URI , smb://[workgroup/]server[:port]/printer (workgroup and port are optional, printer is name of the printer in windows machine). Then click Continue. ex. smb://MYGROUP/10.1.1.20/HPOfficeJet
  6. Next want to choose correct printer model. Shound choose correct printer model. It it not in list, try to choose printer as much as close to your printer.
  7. That's all.

Wednesday, August 25, 2010

Deleted File Recovery in Liunx - PhotoRec

PhotoRec is great tool for recover deleted files in Linux

PhotoRec is a data recovery software tool designed to recover lost files from digital camera memory (CompactFlash, Memory Stick, Secure Digital, SmartMedia, Microdrive, MMC, USB flash drives etc.), hard disks and CD-ROMs. It recovers most common photo formats, including JPEG, and also recovers audio files including MP3, document formats such as Open Office, Microsoft Office, PDF and HTML, and archive formats including ZIP.
PhotoRec does not attempt to write to the damaged media you are about to recover from. Recovered files are instead written to the directory from where you are running PhotoRec or any other directory you choose. PhotoRec is shipped with TestDisk.

Here steps for recover lost data:

Step 1 : As a root user, install PhotoRec by "yum install photorec" in RedHat Linux. After install type photorec in terminal window


Step2 : You'll get following screen


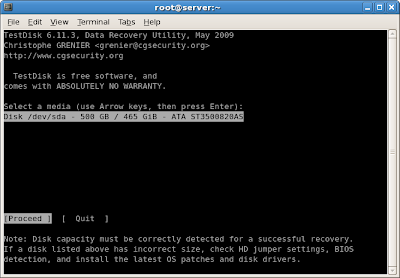
Step 3 : Here want to choose hard disk, Hit Enter for proceed, You'll get following,


Step 4 : Choose partition table type, Our normal table type is Intel ( Normally we using this only ). Next you'll get following page,


 Step 6 : Hit Search for go to next step, Hit options for advanced options, Hit File Opt for choose specified file type recovery.


Step 7 : After Hit Search , you'll get following window. This for choose file system type.This is one of useful option for linux file system,


Step 8 : Now want to choose place for store recoverd files, Don't use same partition for store files. This'll corrupted files and can't recover file successfully.


After completion of file recovery,Open destination directory and get files. Wait until file recovery completion.


By this i have successfully restored lost files. Use it by your one risk. Hope you can successfully restore your lost data. 

Please go PhotoRec official page for more information.

Recover Lost Partitions in Linux - TestDisk

TestDisk is great tool for recover lost partitions in Linux

TestDisk is a free data recovery utility. It was primarily designed to help recover lost data storage partitions and/or make non-booting disks boot-able again when these symptoms are caused by faulty software, certain types of viruses or human error (such as accidentally erasing a partition table).

Here steps for recover lost partition:

Step 1 : As a root user, install testdisk by "yum install testdisk" in RedHat Linux. Type testdisk in terminal.


Step2 : You'll get following screen


Step 3 : Use options for create or skip log files, After that you get following screen. Here we want to choose hard disk for recover lost partition,


Step 4 : Here i use single hard disk, Hit Enter for proceed, You'll get following


Step 5 : Choose partition table type, Our normal table type is Intel ( Normally we using this only ). Next you'll get following page,


 Step 6 : Use options for choose our need, Analyse'll show you list of partition


Step 7 : Hit Enter for Quick Search , This'll analyse our Hard Disk, This process is as shown in figure,


After completion of this, It'll show all partition as available.

By this i have successfully restored lost partitions. Use it by your one risk. Hope you can successfully restore your lost partitions. 

Please go TestDisk official page for more information.

Monday, May 10, 2010

Mount iso files in linux without cd/dvd disk

Here the command for mount iso files in linux without cd/dvd

Step 1 : Create a folder in /mnt/tempiso

Here i created a folder name as tempiso

Step 2 : mount -o loop testiso.iso /mnt/tempiso

Step 3 : Open /mnt/tempiso and get all files

Friday, May 7, 2010

Installing Firefox in Linux ( RHEL 5 )

Hi,
This is a simple method to install firefox in redhat Enterprise Linux 5
It also support all linux operating systems
Step 1 : Download Firefox from here http://www.mozilla.com/en-US/firefox/firefox.html
Step 2 : Extract files on desktop
Step 3 : Copy extracted ( firefox ) folder to /usr/local/share  [ Storing location is your wish ]
Step 4 : That's all. You made it. Now just double click 'firefox' inside firefox folder.
Step 5 : Open with terminal , It ask for default browser. Made it as default and creat a shortcut.

Saturday, May 1, 2010

Updating Firefox in Linux ( Simple method )

Step 1 : Just download new version of Firefox from mozilla.com

Step 2 : Downloaded file in .tar.bz2 extension.

Step 3 : Extract .tat.bz2 file in desktop

Step 4 : Copy all files from extracted folder

Step 5 : Paste into

/usr/lib/firefox_you current_version
folder

Step 6 : Rename this folder with new version ( Not important )

Step 7 : Run Firefox (Your desktop shortcut is enough to do it )

Step 8 : Now Firefox will upgrade


Enjoy new updated version.

It's not proper way to install Firefox in Linux.

It works very well in RHEL5

Installing fonts in RedHat Enterprise Linux 5 ( Simple Method )

Simple method

Step 1 : Just copy ".ttf " fonts to /usr/share/fonts/your_folder_name

Step 2 : Open terminal

Step 3 : Run following commend

#fc-cache /usr/share/fonts/your_folder_name

Step 4 : Logout user and login again


Enjoy

It's simple method and working well for me

Monday, April 26, 2010

Download website with wget in linux

wget is a nice tool for downloading resources from the internet. The basic usage is wget url:

wget http://linuxreviews.org/

Therefore, wget (manual page) + less (manual page) is all you need to surf the internet. The power of wget is that you may download sites recursive, meaning you also get all pages (and images and other data) linked on the front page:

wget -r http://linuxreviews.org/

But many sites do not want you to download their entire site. To prevent this, they check how browsers identify. Many sites refuses you to connect or sends a blank page if they detect you are not using a web-browser. You might get a message like:

Sorry, but the download manager you are using to view this site is not supported. We do not support use of such download managers as flashget, go!zilla, or getright

Wget has a very handy -U option for sites like this. Use -U My-browser to tell the site you are using some commonly accepted browser:

wget -r -p -U Mozilla http://www.stupidsite.com/restricedplace.html

The most important command line options are --limit-rate= and --wait=. You should add --wait=20 to pause 20 seconds between retrievals, this makes sure you are not manually added to a blacklist. --limit-rate defaults to bytes, add K to set KB/s. Example:

wget --wait=20 --limit-rate=20K -r -p -U Mozilla http://www.stupidsite.com/restricedplace.html

A web-site owner will probably get upset if you attempt to download his entire site using a simple wget http://foo.bar command. However, the web-site owner will not even notice you if you limit the download transfer rate and pause between fetching files.

Use --no-parent


--no-parent is a very handy option that guarantees wget will not download anything from the folders beneath the folder you want to acquire. Use this to make sure wget does not fetch more than it needs to if just just want to download the files in a folder.


Source : http://linuxreviews.org/quicktips/wget/

Saturday, March 20, 2010

Block anything based on url keywords by squid proxy

Hai guys/gals,
Here i going to tell about block any sites based on keywords squid proxy.
This help for system administrators in schools and colleges
Here i use linux sever( RHEL5 ) and squid 2.6 stable version.
It simple to do,
Step 1 : Just store what all are key words you want to block
Here i stored keywords in "/etc/squid/badkeys"
Step 2 : Using vim , open squid configuration file
Ex. vim /etc/squid/squid.conf
Step 3 : Use url_regex to block, (Just add following line in acl )
acl badkey url_regex "/etc/squid/badkey"
Ex:
#Recommended minimum configuration:
acl all src 0.0.0.0/0.0.0.0
acl your_network_name src 10.1.1.0/24
acl badkey url_regex "/etc/squid/badkey"
Step 4 : Add following line for deny badkey in http_access
http_access deny badkey
Ex:
http_access allow localhost
http_access deny badkey
http_access allow your_network_name
http_access deny all

Step 5 :That's all. Restart Squid


Friday, February 12, 2010

Clear cache in Linux Server

If you running Proxy Server, Mostly it'll store frequently visiting sits content.

It's one of the best feature for fast browsing, But some few cases it not good.

Here a commend for clear cache files from server,

But it not useful at all conditions,

Step 1 : Open terminal and type following

root@localhost~] # echo 3 > /proc/sys/vm/drop_caches

Step 2 : Hit Enter


That's all.


Note : It's not give solution for all problem related with it.