Saturday, April 9, 2011
Wednesday, April 6, 2011
Telnet on RedHat
Introduction:
Telnet is a network protocol used on the Internet or local area networks to provide a bidirectional interactive text-oriented communications facility using a virtual terminal connection. User data is interspersed in-band with Telnet control information in an 8-bit byte oriented data connection over the Transmission Control Protocol (TCP).
Installing Telnet on Redhat:
yum is the easy way to installing telnet on redhat. You can use DVD repository if don't have RHN support.
#yum install telnet*
It'll install both server and client of telnet.
Enabling/Configuring telnet on RedHat
Open "/etc/xinetd.d/telnet" file using any editor,
Ex. #vim /etc/xinetd.d/telnet
In this file want to change "disable = yes" to "disable = no"
For restarting telnet service run following command, If getting error on stoping service ignore it
#service xinetd restart
#chkconfig xinetd on
Now you can connect telnet server by telnet client on network.
Telnet client
In Linux, open terminal and run this command, #telnet SERVER_IP
In Windows, open dos prompt, >telnet SERVER_IP
Telnet is a network protocol used on the Internet or local area networks to provide a bidirectional interactive text-oriented communications facility using a virtual terminal connection. User data is interspersed in-band with Telnet control information in an 8-bit byte oriented data connection over the Transmission Control Protocol (TCP).
Installing Telnet on Redhat:
yum is the easy way to installing telnet on redhat. You can use DVD repository if don't have RHN support.
#yum install telnet*
It'll install both server and client of telnet.
Enabling/Configuring telnet on RedHat
Open "/etc/xinetd.d/telnet" file using any editor,
Ex. #vim /etc/xinetd.d/telnet
In this file want to change "disable = yes" to "disable = no"
For restarting telnet service run following command, If getting error on stoping service ignore it
#service xinetd restart
#chkconfig xinetd on
Now you can connect telnet server by telnet client on network.
Telnet client
In Linux, open terminal and run this command, #telnet SERVER_IP
In Windows, open dos prompt, >telnet SERVER_IP
Tuesday, April 5, 2011
IpTables - The Linux Firewall
Introduction :
IpTables is the user space program , which is used create rules for packet filtering. IpTables used for create Firewall rules in Linux System. Before going to IpTables , first we want to get some knowledge about Firewall.
A firewall is a device or set of devices designed to permit or deny network transmissions based upon a set of rules and is frequently used to protect networks from unauthorized access. Many personal computer operating systems (windows, linux, mac, etc) include software-based firewalls to protect against threats from the public Internet. Many routers that pass data between networks contain firewall components and, conversely, many firewalls can perform basic routing functions.
Installation on linux:
Before going to installation , we need to check whether our kernel was compiled with iptables support. Follwoing steps are used to check.
# cat /boot/config-your.kernel.version.here | grep -i "CONFIG_IP_NF_IPTABLES"
If we get the display as CONFIG_IP_NF_IPTABLES=m , Our Kernel was compiled with iptables support. '=m' means iptables was compiled as a module.
First we need to check whether the iptables installed already. Here i'm using redhat enterprice linux. So using the command as follows,
# rpm -qa | grep iptables.
If you get output like iptables-INSTALLED-VERSION , Or you need to install iptables.
For installation, download iptables file from internet , or install using yum.
# rpm -qa | grep iptables
# rpm -Uvh iptables-downloaded.version.rpm
Importent files for iptables
/etc/init.d/iptables is the INIT script which is used to start, stop the service and/or to save the rulesets.
/etc/sysconfig/iptables this is the file that holds the saved rulesets.
/sbin/iptables and this is the iptables binary.
Checking current configuration
#iptables -L
There are 3 default chains avaliable. INPUT, OUTPUT, FORWARD.
INPUT - Rules for incoming traffic to server.
OUTPUT - Rules for outgoing traffic from server to Internet.
FORWARD - Rules for traffic forward to chients or server on network (LAN...).
When traffic moves through Linux kernel, a TARGET is determined by whether the packet matches a rule in the rulesets or not. There are three main targets are avaliable.
ACCEPT - Traffic is allowed to pass through linux server to its destination.
REJECT - Traffic is blocked from its destination and a packet is sent back to the sending host with a explanation by linux server.
DROP - Traffic is blocked with no explanation (Like closing connection).
Before going to configure new ruleset , following things are very importent.
Should know the order of rules going to add in ruleset. If order changes , It will give very bad results sometime. If your first rule is to deny everything... then no matter what you specifically allow, it will be denied.
Rule set is not active till you save rule. It will be done by seprate command.
If you are using ssh for configure iptables on remote server, first you shoud allow yourself.
Basic Iptables Options
Here are some of the iptables options.
-A - Append this rule to a rule chain. Valid chains for what we're doing are INPUT, FORWARD and OUTPUT, but we mostly deal with INPUT in this tutorial, which affects only incoming traffic.
-L - List the current filter rules.
-m conntrack - Allow filter rules to match based on connection state. Permits the use of the --ctstate option.
--ctstate - Define the list of states for the rule to match on. Valid states are:
NEW - The connection has not yet been seen.
RELATED - The connection is new, but is related to another connection already permitted.
ESTABLISHED - The connection is already established.
INVALID - The traffic couldn't be identified for some reason.
-m limit - Require the rule to match only a limited number of times. Allows the use of the --limit option. Useful for limiting logging rules.
--limit - The maximum matching rate, given as a number followed by "/second", "/minute", "/hour", or "/day" depending on how often you want the rule to match. If this option is not used and -m limit is used, the default is "3/hour".
-p - The connection protocol used.
--dport - The destination port(s) required for this rule. A single port may be given, or a range may be given as start:end, which will match all ports from start to end, inclusive.
-j - Jump to the specified target. By default, iptables allows four targets:
ACCEPT - Accept the packet and stop processing rules in this chain.
REJECT - Reject the packet and notify the sender that we did so, and stop processing rules in this chain.
DROP - Silently ignore the packet, and stop processing rules in this chain.
LOG - Log the packet, and continue processing more rules in this chain. Allows the use of the --log-prefix and --log-level options.
--log-prefix - When logging, put this text before the log message. Use double quotes around the text to use.
--log-level - Log using the specified syslog level. 7 is a good choice unless you specifically need something else.
-i - Only match if the packet is coming in on the specified interface.
-I - Inserts a rule. Takes two options, the chain to insert the rule into, and the rule number it should be.
-I INPUT 5 would insert the rule into the INPUT chain and make it the 5th rule in the list.
-v - Display more information in the output. Useful for if you have rules that look similar without using -v.
-s --source - address[/mask] source specification
-d --destination - address[/mask] destination specification
-o --out-interface - output name[+] network interface name ([+] for wildcard)
Allowing connections
We want to use some standard rules for general network traffic. The 3 way handshake between two hosts when transmitting data.
Individual REJECTS First:
BAD GUYS (Block Source IP Address):
# iptables -A INPUT -s 172.34.5.8 -j DROP
NO SPAMMERS (notice the use of FQDN):
# iptables -A INPUT -s mail.spammer.org -d 10.1.15.1 -p tcp --dport 25 -j REJECT
Then Open it up
MYSQL (Allow Remote Access To Particular IP):
# iptables -A INPUT -s 172.50.3.45 -d 10.1.15.1 -p tcp --dport 3306 -j ACCEPT
SSH:
# iptables -A INPUT -d 10.1.15.1 -p tcp --dport 22 -j ACCEPT
Sendmail/Postfix:
# iptables -A INPUT -d 10.1.15.1 -p tcp --dport 25 -j ACCEPT
FTP: (Notice how you can specify a range of ports 20-21)
# iptables -A INPUT -d 10.1.15.1 -p tcp --dport 20:21 -j ACCEPT
Passive FTP Ports Maybe: (Again, specifying ports 50000 through 50050 in one rule)
# iptables -A INPUT -d 10.1.15.1 -p tcp --dport 50000:50050 -j ACCEPT
HTTP/Apache
# iptables -A INPUT -d 10.1.15.1 -p tcp --dport 80 -j ACCEPT
SSL/Apache
# iptables -A INPUT -d 10.1.15.1 -p tcp --dport 443 -j ACCEPT
IMAP
# iptables -A INPUT -d 10.1.15.1 -p tcp --dport 143 -j ACCEPT
IMAPS
# iptables -A INPUT -d 10.1.15.1 -p tcp --dport 993 -j ACCEPT
POP3
# iptables -A INPUT -d 10.1.15.1 -p tcp --dport 110 -j ACCEPT
POP3S
# iptables -A INPUT -d 10.1.15.1 -p tcp --dport 995 -j ACCEPT
Any Traffic From Localhost:
# iptables -A INPUT -d 10.1.15.1 -s 127.0.0.1 -j ACCEPT
ICMP/Ping:
# iptables -A INPUT -d 10.1.15.1 -p icmp -j ACCEPT
Global REJECTS Last:
Reject everything else to that IP:
# iptables -A INPUT -d 10.1.15.1 -j REJECT
Or, reject everything else coming through to any IP:
# iptables -A INPUT -j REJECT
# iptables -A FORWARD -j REJECT
Saving rules in iptables
For save active rules:
# /etc/init.d/iptables save This will save rules to '/etc/sysconfig/iptables'.
If start iptables, the rules are read from '/etc/sysconfig/iptables'
# /etc/init.d/iptables startStarting iptables [OK]
If you stop iptables, all rules are flushed
# /etc/init.d/iptables stopStopping iptables [OK]
Export and importing rulesets to file
# iptables-save > /root/iptables-save.out This will save rules to iptables-save.out file
# iptables-restore -c /root/iptables-save.out
The -c tells iptables-restore that this is file was created using iptables-save to ruleset.
Conclusion
This is a basic tutorial about iptables. We can do lot of things by iptables. I hope good practice on iptables only give better knowledge. Keep practicing.
Reference : Lot of articles from internet. Thanks to all.
IpTables is the user space program , which is used create rules for packet filtering. IpTables used for create Firewall rules in Linux System. Before going to IpTables , first we want to get some knowledge about Firewall.
A firewall is a device or set of devices designed to permit or deny network transmissions based upon a set of rules and is frequently used to protect networks from unauthorized access. Many personal computer operating systems (windows, linux, mac, etc) include software-based firewalls to protect against threats from the public Internet. Many routers that pass data between networks contain firewall components and, conversely, many firewalls can perform basic routing functions.
Installation on linux:
Before going to installation , we need to check whether our kernel was compiled with iptables support. Follwoing steps are used to check.
# cat /boot/config-your.kernel.version.here | grep -i "CONFIG_IP_NF_IPTABLES"
If we get the display as CONFIG_IP_NF_IPTABLES=m , Our Kernel was compiled with iptables support. '=m' means iptables was compiled as a module.
First we need to check whether the iptables installed already. Here i'm using redhat enterprice linux. So using the command as follows,
# rpm -qa | grep iptables.
If you get output like iptables-INSTALLED-VERSION , Or you need to install iptables.
For installation, download iptables file from internet , or install using yum.
# rpm -qa | grep iptables
# rpm -Uvh iptables-downloaded.version.rpm
Importent files for iptables
/etc/init.d/iptables is the INIT script which is used to start, stop the service and/or to save the rulesets.
/etc/sysconfig/iptables this is the file that holds the saved rulesets.
/sbin/iptables and this is the iptables binary.
Checking current configuration
#iptables -L
There are 3 default chains avaliable. INPUT, OUTPUT, FORWARD.
INPUT - Rules for incoming traffic to server.
OUTPUT - Rules for outgoing traffic from server to Internet.
FORWARD - Rules for traffic forward to chients or server on network (LAN...).
When traffic moves through Linux kernel, a TARGET is determined by whether the packet matches a rule in the rulesets or not. There are three main targets are avaliable.
ACCEPT - Traffic is allowed to pass through linux server to its destination.
REJECT - Traffic is blocked from its destination and a packet is sent back to the sending host with a explanation by linux server.
DROP - Traffic is blocked with no explanation (Like closing connection).
Before going to configure new ruleset , following things are very importent.
Should know the order of rules going to add in ruleset. If order changes , It will give very bad results sometime. If your first rule is to deny everything... then no matter what you specifically allow, it will be denied.
Rule set is not active till you save rule. It will be done by seprate command.
If you are using ssh for configure iptables on remote server, first you shoud allow yourself.
Basic Iptables Options
Here are some of the iptables options.
-A - Append this rule to a rule chain. Valid chains for what we're doing are INPUT, FORWARD and OUTPUT, but we mostly deal with INPUT in this tutorial, which affects only incoming traffic.
-L - List the current filter rules.
-m conntrack - Allow filter rules to match based on connection state. Permits the use of the --ctstate option.
--ctstate - Define the list of states for the rule to match on. Valid states are:
NEW - The connection has not yet been seen.
RELATED - The connection is new, but is related to another connection already permitted.
ESTABLISHED - The connection is already established.
INVALID - The traffic couldn't be identified for some reason.
-m limit - Require the rule to match only a limited number of times. Allows the use of the --limit option. Useful for limiting logging rules.
--limit - The maximum matching rate, given as a number followed by "/second", "/minute", "/hour", or "/day" depending on how often you want the rule to match. If this option is not used and -m limit is used, the default is "3/hour".
-p - The connection protocol used.
--dport - The destination port(s) required for this rule. A single port may be given, or a range may be given as start:end, which will match all ports from start to end, inclusive.
-j - Jump to the specified target. By default, iptables allows four targets:
ACCEPT - Accept the packet and stop processing rules in this chain.
REJECT - Reject the packet and notify the sender that we did so, and stop processing rules in this chain.
DROP - Silently ignore the packet, and stop processing rules in this chain.
LOG - Log the packet, and continue processing more rules in this chain. Allows the use of the --log-prefix and --log-level options.
--log-prefix - When logging, put this text before the log message. Use double quotes around the text to use.
--log-level - Log using the specified syslog level. 7 is a good choice unless you specifically need something else.
-i - Only match if the packet is coming in on the specified interface.
-I - Inserts a rule. Takes two options, the chain to insert the rule into, and the rule number it should be.
-I INPUT 5 would insert the rule into the INPUT chain and make it the 5th rule in the list.
-v - Display more information in the output. Useful for if you have rules that look similar without using -v.
-s --source - address[/mask] source specification
-d --destination - address[/mask] destination specification
-o --out-interface - output name[+] network interface name ([+] for wildcard)
Allowing connections
We want to use some standard rules for general network traffic. The 3 way handshake between two hosts when transmitting data.
- NEW => Server1 connects to Server2 issuing a SYN (Synchronize) packet.
- RELATED => Server 2 receives the SYN packet, and then responds with a SYN-ACK (Synchronize Acknowledgment) packet.
- ESTABLISHED => Server 1 receives the SYN-ACK packet and then responds with the final ACK (Acknowledgment) packet.
After this 3 way handshake is complete, the traffic is now ESTABLISHED. In order for this type of TCP communication, something similar to these three rules are necessary:
# iptables -A INPUT -m state --state RELATED,ESTABLISHED -j ACCEPT
# iptables -A FORWARD -i eth0 -m state --state RELATED,ESTABLISHED -j ACCEPT
# iptables -A OUTPUT -m state --state NEW,RELATED,ESTABLISHED -j ACCEPT
The last rule obviously allows any traffic the leave the server.
Now that we have our basics set in place, lets see what iptables lists for our rulesets:
# iptables --list
Chain INPUT (policy ACCEPT) target prot opt source destination
ACCEPT all -- anywhere anywhere state RELATED,ESTABLISHED
Chain FORWARD (policy ACCEPT) target prot opt source destination
ACCEPT all -- anywhere anywhere state RELATED,ESTABLISHED
Chain OUTPUT (policy ACCEPT) target prot opt source destination
ACCEPT all -- anywhere anywhere state NEW,RELATED,ESTABLISHED
Allowing Incoming Traffic on Specific Ports
You could start by blocking traffic, but you might be working over SSH, where you would need to allow SSH before blocking everything else.
To allow incoming traffic on the default SSH port (22), you could tell iptables to allow all TCP traffic on that port to come in.
# iptables -A INPUT -p tcp --dport ssh -j ACCEPT
Referring back to the list above, you can see that this tells iptables:
• append this rule to the input chain (-A INPUT) so we look at incoming traffic
• check to see if it is TCP (-p tcp).
• if so, check to see if the input goes to the SSH port (--dport ssh).
• if so, accept the input (-j ACCEPT).
Lets check the rules: (only the first few lines shown, you will see more)
# iptables -L
Chain INPUT (policy ACCEPT) target prot opt source destination
ACCEPT all -- anywhere anywhere state RELATED,ESTABLISHED
ACCEPT tcp -- anywhere anywhere tcp dpt:ssh
Allow all incoming web traffic
# iptables -A INPUT -p tcp --dport 80 -j ACCEPT
# iptables -A INPUT -m state --state RELATED,ESTABLISHED -j ACCEPT
# iptables -A FORWARD -i eth0 -m state --state RELATED,ESTABLISHED -j ACCEPT
# iptables -A OUTPUT -m state --state NEW,RELATED,ESTABLISHED -j ACCEPT
The last rule obviously allows any traffic the leave the server.
Now that we have our basics set in place, lets see what iptables lists for our rulesets:
# iptables --list
Chain INPUT (policy ACCEPT) target prot opt source destination
ACCEPT all -- anywhere anywhere state RELATED,ESTABLISHED
Chain FORWARD (policy ACCEPT) target prot opt source destination
ACCEPT all -- anywhere anywhere state RELATED,ESTABLISHED
Chain OUTPUT (policy ACCEPT) target prot opt source destination
ACCEPT all -- anywhere anywhere state NEW,RELATED,ESTABLISHED
Allowing Incoming Traffic on Specific Ports
You could start by blocking traffic, but you might be working over SSH, where you would need to allow SSH before blocking everything else.
To allow incoming traffic on the default SSH port (22), you could tell iptables to allow all TCP traffic on that port to come in.
# iptables -A INPUT -p tcp --dport ssh -j ACCEPT
Referring back to the list above, you can see that this tells iptables:
• append this rule to the input chain (-A INPUT) so we look at incoming traffic
• check to see if it is TCP (-p tcp).
• if so, check to see if the input goes to the SSH port (--dport ssh).
• if so, accept the input (-j ACCEPT).
Lets check the rules: (only the first few lines shown, you will see more)
# iptables -L
Chain INPUT (policy ACCEPT) target prot opt source destination
ACCEPT all -- anywhere anywhere state RELATED,ESTABLISHED
ACCEPT tcp -- anywhere anywhere tcp dpt:ssh
Allow all incoming web traffic
# iptables -A INPUT -p tcp --dport 80 -j ACCEPT
Checking our rules, we have
# iptables -L
Chain INPUT (policy ACCEPT)target prot opt source destination
ACCEPT all -- anywhere anywhere state RELATED,ESTABLISHED
ACCEPT tcp -- anywhere anywhere tcp dpt:ssh
ACCEPT tcp -- anywhere anywhere tcp dpt:www
Chain INPUT (policy ACCEPT)target prot opt source destination
ACCEPT all -- anywhere anywhere state RELATED,ESTABLISHED
ACCEPT tcp -- anywhere anywhere tcp dpt:ssh
ACCEPT tcp -- anywhere anywhere tcp dpt:www
Some more ruleset for iptables, For easy understanding
Individual REJECTS First:
BAD GUYS (Block Source IP Address):
# iptables -A INPUT -s 172.34.5.8 -j DROP
NO SPAMMERS (notice the use of FQDN):
# iptables -A INPUT -s mail.spammer.org -d 10.1.15.1 -p tcp --dport 25 -j REJECT
Then Open it up
MYSQL (Allow Remote Access To Particular IP):
# iptables -A INPUT -s 172.50.3.45 -d 10.1.15.1 -p tcp --dport 3306 -j ACCEPT
SSH:
# iptables -A INPUT -d 10.1.15.1 -p tcp --dport 22 -j ACCEPT
Sendmail/Postfix:
# iptables -A INPUT -d 10.1.15.1 -p tcp --dport 25 -j ACCEPT
FTP: (Notice how you can specify a range of ports 20-21)
# iptables -A INPUT -d 10.1.15.1 -p tcp --dport 20:21 -j ACCEPT
Passive FTP Ports Maybe: (Again, specifying ports 50000 through 50050 in one rule)
# iptables -A INPUT -d 10.1.15.1 -p tcp --dport 50000:50050 -j ACCEPT
HTTP/Apache
# iptables -A INPUT -d 10.1.15.1 -p tcp --dport 80 -j ACCEPT
SSL/Apache
# iptables -A INPUT -d 10.1.15.1 -p tcp --dport 443 -j ACCEPT
IMAP
# iptables -A INPUT -d 10.1.15.1 -p tcp --dport 143 -j ACCEPT
IMAPS
# iptables -A INPUT -d 10.1.15.1 -p tcp --dport 993 -j ACCEPT
POP3
# iptables -A INPUT -d 10.1.15.1 -p tcp --dport 110 -j ACCEPT
POP3S
# iptables -A INPUT -d 10.1.15.1 -p tcp --dport 995 -j ACCEPT
Any Traffic From Localhost:
# iptables -A INPUT -d 10.1.15.1 -s 127.0.0.1 -j ACCEPT
ICMP/Ping:
# iptables -A INPUT -d 10.1.15.1 -p icmp -j ACCEPT
Global REJECTS Last:
Reject everything else to that IP:
# iptables -A INPUT -d 10.1.15.1 -j REJECT
Or, reject everything else coming through to any IP:
# iptables -A INPUT -j REJECT
# iptables -A FORWARD -j REJECT
Saving rules in iptables
For save active rules:
# /etc/init.d/iptables save This will save rules to '/etc/sysconfig/iptables'.
If start iptables, the rules are read from '/etc/sysconfig/iptables'
# /etc/init.d/iptables startStarting iptables [OK]
If you stop iptables, all rules are flushed
# /etc/init.d/iptables stopStopping iptables [OK]
Export and importing rulesets to file
# iptables-save > /root/iptables-save.out This will save rules to iptables-save.out file
# iptables-restore -c /root/iptables-save.out
The -c tells iptables-restore that this is file was created using iptables-save to ruleset.
Conclusion
This is a basic tutorial about iptables. We can do lot of things by iptables. I hope good practice on iptables only give better knowledge. Keep practicing.
Reference : Lot of articles from internet. Thanks to all.
Tuesday, March 29, 2011
SNMP - Simple Network Management Protocol
SNMP (Simple Network Management Protocol) is the protocol , that can be used for monitoring and managing hosts in network. Network may be LAN or WAN whatever. Hosts may be routers, switches, servers, workstations, printers, modem and more. Every hosts under network will be monitoring and managing by SNMP. SNMP have 3 main parts. Those are
- Managed device
- Agent - Software which runs on managed devices
- Network management system (NMS) — Software which runs on the manager
Managed Device :
The managed device is normally a host in network(or network elements). As above it may be router,switch, client computer, server etc. It implements an SNMP interface that allows unidirectional (read-only) or bidirectional (read and write) access to node-specific information. Managed devices exchange node-specific information with the NMSs.
Agent:
Agent is a software running in Managed device. This software act as an agent. That means, software will get the information about managed device and send it to NMS. The information is related with software, hardware installed in managed device, network traffic and related information. We can tell that information as log. Depend upon the agent, our work maybe monitoring or managing. If we have read access to the managed device via agent, we can do the monitoring alone. If we have write access to the managed device we can do the managing operation.
NMS:
NMS (Network Management System) is combination of manager system ( mostly server) and software of managing. ( It's not like agent). It executes applications that monitor and control managed devices. NMSs require bulk amount of the processing and memory resources. One or more NMSs may exist on any managed network.
Management Information base (MIB)
MIB is a virtual database used for managing the entities in a communications network. Most often associated with the Simple Network Management Protocol (SNMP), the term is also used more generically in contexts such as in OSI/ISO Network management model. While intended to refer to the complete collection of management information available on an entity, it is often used to refer to a particular subset, more correctly referred to as MIB-module. MIBs use the notation defined by ASN.1
Note: Abstract Syntax Notation One (ASN.1) is a standard and flexible notation that describes data structures for representing, encoding, transmitting, and decoding data. It provides a set of formal rules for describing the structure of objects that are independent of machine-specific encoding techniques and is a precise, formal notation that removes ambiguities.
Protocol details
SNMP operates in the Application Layer of the Internet Protocol Suite (Layer 7 of the OSI model). The SNMP agent receives requests on UDP port 161. The manager may send requests from any available source port to port 161 in the agent. The agent response will be sent back to the source port on the manager. The manager receives notifications (Traps and InformRequests) on port 162. The agent may generate notifications from any available port.
SNMPv1 specifies five core protocol data units (PDUs). Two other PDUs, GetBulkRequest and InformRequest were added in SNMPv2 and carried over to SNMPv3.All SNMP PDUs are constructed as follows:
The seven SNMP protocol data units (PDUs) are as follows:
GetRequest
A manager-to-agent request to retrieve the value of a variable or list of variables. Desired variables are specified in variable bindings (values are not used). Retrieval of the specified variable values is to be done as an atomic operation by the agent. A Response with current values is returned.
SetRequest
A manager-to-agent request to change the value of a variable or list of variables. Variable bindings are specified in the body of the request. Changes to all specified variables are to be made as an atomic operation by the agent. A Response with (current) new values for the variables is returned.
GetNextRequest
A manager-to-agent request to discover available variables and their values. Returns a Response with variable binding for the lexicographically next variable in the MIB. The entire MIB of an agent can be walked by iterative application of GetNextRequest starting at OID 0. Rows of a table can be read by specifying column OIDs in the variable bindings of the request.
GetBulkRequest
Optimized version of GetNextRequest. A manager-to-agent request for multiple iterations of GetNextRequest. Returns a Response with multiple variable bindings walked from the variable binding or bindings in the request. PDU specific non-repeaters and max-repetitions fields are used to control response behavior. GetBulkRequest was introduced in SNMPv2.
Response
Returns variable bindings and acknowledgement from agent to manager for GetRequest, SetRequest, GetNextRequest, GetBulkRequest and InformRequest. Error reporting is provided by error-status and error-index fields. Although it was used as a response to both gets and sets, this PDU was called GetResponse in SNMPv1.
Trap
Asynchronous notification from agent to manager. Includes current sysUpTime value, an OID identifying the type of trap and optional variable bindings. Destination addressing for traps is determined in an application-specific manner typically through trap configuration variables in the MIB. The format of the trap message was changed in SNMPv2 and the PDU was renamed SNMPv2-Trap.
InformRequest
Acknowledged asynchronous notification from manager to manager. This PDU uses the same format as the SNMPv2 version of Trap. Manager-to-manager notifications were already possible in SNMPv1 (using a Trap), but as SNMP commonly runs over UDP where delivery is not assured and dropped packets are not reported, delivery of a Trap was not guaranteed. InformRequest fixes this by sending back an acknowledgement on receipt. Receiver replies with Response parroting all information in the InformRequest. This PDU was introduced in SNMPv2.
Reference : http://en.wikipedia.org/wiki/Management_information_base
Protocol details
SNMP operates in the Application Layer of the Internet Protocol Suite (Layer 7 of the OSI model). The SNMP agent receives requests on UDP port 161. The manager may send requests from any available source port to port 161 in the agent. The agent response will be sent back to the source port on the manager. The manager receives notifications (Traps and InformRequests) on port 162. The agent may generate notifications from any available port.
SNMPv1 specifies five core protocol data units (PDUs). Two other PDUs, GetBulkRequest and InformRequest were added in SNMPv2 and carried over to SNMPv3.All SNMP PDUs are constructed as follows:
| IP header | UDP header | version | community | PDU-type | request-id | error-status | error-index | variable bindings |
The seven SNMP protocol data units (PDUs) are as follows:
GetRequest
A manager-to-agent request to retrieve the value of a variable or list of variables. Desired variables are specified in variable bindings (values are not used). Retrieval of the specified variable values is to be done as an atomic operation by the agent. A Response with current values is returned.
SetRequest
A manager-to-agent request to change the value of a variable or list of variables. Variable bindings are specified in the body of the request. Changes to all specified variables are to be made as an atomic operation by the agent. A Response with (current) new values for the variables is returned.
GetNextRequest
A manager-to-agent request to discover available variables and their values. Returns a Response with variable binding for the lexicographically next variable in the MIB. The entire MIB of an agent can be walked by iterative application of GetNextRequest starting at OID 0. Rows of a table can be read by specifying column OIDs in the variable bindings of the request.
GetBulkRequest
Optimized version of GetNextRequest. A manager-to-agent request for multiple iterations of GetNextRequest. Returns a Response with multiple variable bindings walked from the variable binding or bindings in the request. PDU specific non-repeaters and max-repetitions fields are used to control response behavior. GetBulkRequest was introduced in SNMPv2.
Response
Returns variable bindings and acknowledgement from agent to manager for GetRequest, SetRequest, GetNextRequest, GetBulkRequest and InformRequest. Error reporting is provided by error-status and error-index fields. Although it was used as a response to both gets and sets, this PDU was called GetResponse in SNMPv1.
Trap
Asynchronous notification from agent to manager. Includes current sysUpTime value, an OID identifying the type of trap and optional variable bindings. Destination addressing for traps is determined in an application-specific manner typically through trap configuration variables in the MIB. The format of the trap message was changed in SNMPv2 and the PDU was renamed SNMPv2-Trap.
InformRequest
Acknowledged asynchronous notification from manager to manager. This PDU uses the same format as the SNMPv2 version of Trap. Manager-to-manager notifications were already possible in SNMPv1 (using a Trap), but as SNMP commonly runs over UDP where delivery is not assured and dropped packets are not reported, delivery of a Trap was not guaranteed. InformRequest fixes this by sending back an acknowledgement on receipt. Receiver replies with Response parroting all information in the InformRequest. This PDU was introduced in SNMPv2.
Reference : http://en.wikipedia.org/wiki/Management_information_base
Saturday, January 29, 2011
Download Mobile applications to your PC
We can't download some mobile applications to pc,
ex : gmail
Why want to download those applications to PC ,
Here the trick to download those type of applications to PC...
It's very simple.
Step 1 : First download that application to your mobile by gprs,
Step 2 : Move downloaded application from phone memory to memory card.
Step 3 : By use of data cable or blue tooth, open your memory card as mass storage in pc.
Step 4 : Open application location, there you can find .jad and .jar file (ex: application_name.jad)
Step 5 : Open .jad file using text editor, there you can find a location of .jar on internet server.
Step 6 : Before URL you can find "MIDlet-Jar-URL:"
Step 7 : Copy that link location and past it to your pc browser, and hit enter.
Step 8 : Download will start, then you can copy that file to mobile and can use. :-)
Steps for download GMail mobile application from m.google.com
Go to m.gmail.com and use faster gmail, download gmail application to mobile ( mostly it store in phone memory).
Move phone memory to memory card.
Copy .jad file from mobile memory to pc
Open .jad on notepad. find line,
Copy to memory card and use.
* U can use this link for download .jar file, But there is chance, that application not to work. So do all steps.
Drawback : Can't update application.
My Mobile : Nokia 6303i classic
ex : gmail
Why want to download those applications to PC ,
- We can access applications from memory card
- If you move applications from phone memory to memory card also it'll work, but once u removed your memory card, it won't work.
Here the trick to download those type of applications to PC...
It's very simple.
Step 1 : First download that application to your mobile by gprs,
Step 2 : Move downloaded application from phone memory to memory card.
Step 3 : By use of data cable or blue tooth, open your memory card as mass storage in pc.
Step 4 : Open application location, there you can find .jad and .jar file (ex: application_name.jad)
Step 5 : Open .jad file using text editor, there you can find a location of .jar on internet server.
Step 6 : Before URL you can find "MIDlet-Jar-URL:"
Step 7 : Copy that link location and past it to your pc browser, and hit enter.
Step 8 : Download will start, then you can copy that file to mobile and can use. :-)
Steps for download GMail mobile application from m.google.com
Go to m.gmail.com and use faster gmail, download gmail application to mobile ( mostly it store in phone memory).
Move phone memory to memory card.
Copy .jad file from mobile memory to pc
Open .jad on notepad. find line,
MIDlet-Jar-URL: http://m.google.com/mail/download/binaries/L1/2.0.6/mail_n60-3.jarUnderlined link may be change, Copy that line to browser and download file.
Copy to memory card and use.
* U can use this link for download .jar file, But there is chance, that application not to work. So do all steps.
Drawback : Can't update application.
My Mobile : Nokia 6303i classic
Tuesday, January 18, 2011
Learning MySQL on linux - Installation
MySQL on Linux
MySQL - Installation
Installing mysql on Redhat is very simple wia repostory also packages are avaliable in redhat dvd itself. For more information click, dvd repository and rpm forge. For detailed installation about MySQL with all systems check this page.
Normaly MySQL having 2 parts,
- MySQL Server
- MySQL Client
MySQL Client - It's a program for user intraction and we can get stored data by queries.
Installing MySQL with repository
Open terminal window and in root account, run following comment
#yum install mysql*

type y and hit enter, this will install MySQL on your redhat system.
For start MySQL,
in terminal type " service mysqld start " without cotes.

For check status of MySQL running on your linux box, in terminal type "service mysqld status " without cotes.

Login in to MySQL on linux box,
In terminal window, type
#mysql -u root mysql
and hit enter, you get a mysql prompt as follow,

In mysql -u root mysql,
mysql :
mysql -u root mysql
highlighted 'mysql' will start mysql client for user intraction.
-u :
mysql -u root mysql
highlighted '-u' says to MySQL chient which user want to login into MySQL server.
root :
mysql -u root mysql
highlighted 'root' mentioning mysql should login as root user. (It's not linux root user, It's root user of MySQL server). It gives full control of MySQL server.
mysql:
mysql -u root mysql
highlighted 'mysql' is a database, this database in by default in MySQL server. It have several table.
Set password for MySQL user:
type following command after login in to mysql server,
mysql>SET PASSWORD FOR root@localhost=PASSWORD('rootpass');
here,
SET PASSWORD FOR root@localhost=PASSWORD('rootpass');
highlighted things are queries,
root@localhost, is user name with host address ,
rootpass is password for root login.
Learning MySQL on linux - Introduction
MySQL on Linux
MySQL - Introduction
MySQL is a relational database management system (RDBMS).
The Database is a system for store, organize and retrieve large amount of data fast and easily. It have a collection of data for multiple uses in digital form.
A Database Management System (DBMS) is a set of computer programs that controls the creation, maintenance, and the use of a database. A DBMS is a system software package that helps the use of integrated collection of data records and files known as databases. It allows different user application programs to easily access the same database. In large systems, a DBMS allows users and other software to store and retrieve data in a structured way. Instead of having to write computer programs to extract information, user can ask simple questions in a query language. DBMSs may use any of a variety of database models, such as the network model or relational model.
A Database model is the theoretical foundation of a database and fundamentally determines in which manner data can be stored, organized and manipulated in a database system. It thereby defines the infrastructure offered by a particular database system. The most popular example of a database model is the relational model.
Models:
- Hierarchical model
- Network model
- Relational model
- Entity-relationship
- Object-relational model
- Object model
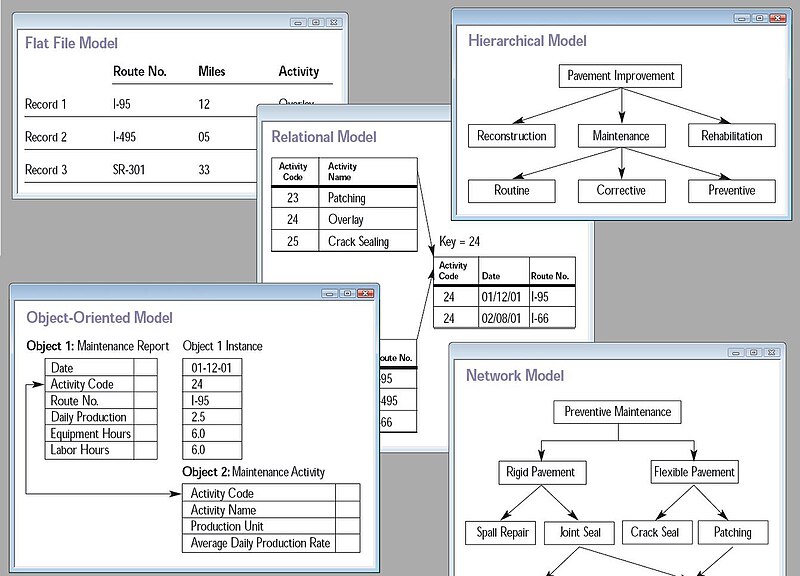
The relational model for database management is a database model based on first-order predicate logic, first formulated and proposed in 1969 by E.F. Codd.
A relational database management system (RDBMS) is a database management system (DBMS) that is based on the relational model as introduced by E. F. Codd. Most popular commercial and open source databases currently in use are based on the relational database model.
A short definition of an RDBMS may be a DBMS in which data is stored in the form of tables and the relationship among the data is also stored in the form of tables.
SQL - Structured Query Language is database computer language designed for managing data in Relational database management system. ( Developed by IDM )
MySQL - is a relational database management system (RDBMS) that runs as a server providing multi-user access to a number of databases. The MySQL development project has made its source code available under the terms of the GNU General Public License, as well as under a variety of proprietary agreements. MySQL was owned and sponsored by a single for-profit firm, the Swedish company MySQL AB, now owned by Oracle Corporation.
Difference between SQL & MySQL
SQL (Structured Query Language) is computer language that can be used to access data stored in relational databases. SQL is not itself a standalone computer application, but is part of many relational Database programs like MySQL, Oracle, Sybase, Microsoft SQL Server, etc.
MySQL is open source database management system. It's an application. It've SQL interpreter, a database manager component, GUI database viewers, and session monitoring tools, etc. MySQL is a multithreaded, multi-user SQL database management system (DBMS) providing multi-user access to a number of databases.
The difference between SQL and MySQL are like, difference between HTML and Dreamweaver. HTML is webpages standard, dreamweaver is computer application that can be used to create, edit webpages.
Reference : Wikipedia and some websites on Internet.
Subscribe to:
Posts (Atom)